The Anchor Point Tool in Illustrator
Adobe, Illustrator
When working in Illustrator, drawing with the Pen tool (producing Bezier curves) is a mainstay of many documents. (And in a couple other graphics programs, too.) But sometimes the tools that go with the Pen take a little time to get comfortable with. And the one I’ve been told is frankly a little confusing is the Anchor Point tool (which used to be known as the Convert Anchor Point tool, describing what it does).
You may know there are three main kinds of anchor points: Curve points, that have a smooth curve going in and coming out; Corner points, which have a sharp angle between two straight line segments; “Hybrid” points, curved on one side, straight on the other. Converting between them is easy, but using the tool may take a little practice.
Let’s say you want to convert from Corner to Curve.

Switch to the Anchor Point tool, find the anchor point, put the sharp end of the V on it, hold down the mouse button, and drag. As you drag, you “draw out” control handles, which tell the curve what to do.
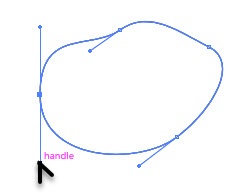
Some people think they need to do this and get them pointing in the right direction at the same time. Not necessary, though you can if you want.
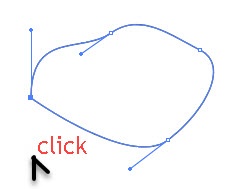
The opposite is even simpler. To go from Curve to Corner, use the Anchor Point tool to simply click on the curve anchor point. The control handles disappear. Done.
It’s creating a hybrid point that sometimes causes a little trouble, but it’s not really hard. Usually it’s easiest to create a Curve point first. Then switch to the Anchor Point tool, put the point of the V on the end of the control handle you want to get rid of, and click. (Don’t drag, though.)
That side now becomes the Corner side, as it were. Dragging from the anchor point brings both handles back.
You can even “break” the connection between the two handles and simply grab one with the A.P.T., give a short drag clockwise or counterclockwise, and the two handles are now independent of each other.

Or hold down the Alt key, and click a “broken” handle to restore the connection so the two now stay in a straight line again.
Practicing a little with the tool usually makes all this pretty easy. Just take your time.
To see how this fits into the workings of the program, try our Adobe Illustrator training.