How to Create Custom Fields in Microsoft Project
Microsoft Project, Microsoft Project 2010, Microsoft Project 2013 Training, Microsoft Project 2016, Project Management
MS Project has a LARGE number of fields set up by default, for almost anything the program can track. But even with all the feedback the design team gets, they can’t anticipate everything a user might need to monitor during a project. So the team built in the ability to create, or rather modify, “custom” (unnamed generic) fields which are held in reserve for just this situation.
One example might be which resources belong to which department in a company. The Group field in the Resource Sheet could be used to contain this information, but some users already employ it for, say, internal versus external, or a non-company-related item. So setting up a resource field for this would make some sense.
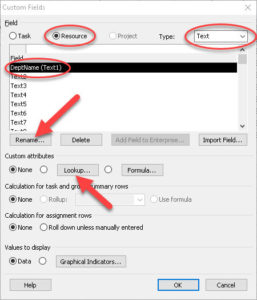
Bringing up the dialog box is easy—Project tab on the Ribbon, Properties group, and click the Custom Fields button. We then choose from the fields what we want to create; in this case, the Resource (at top), along with what kind of data it will hold (Type: on the right), namely text (as in department name). We rename the field (Text1), call it Department or DeptName, or similar, as we like.

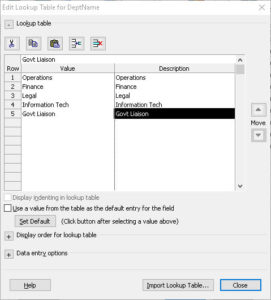
The next step is to bring up the place where we can write in the department names. Almost right in the center of the Custom Fields box, we click the “Lookup…” button. And in the second dialog box, the Value and Description columns make this part easy. Values and descriptions can match, or not, as we see fit; as long as we understand what we’re selecting, it’s fine.
Finally, we OK out of the boxes, navigate (in this case) to the Resource Sheet, and add the column on the end. (Or wherever we feel appropriate.) A lookup table allows us to choose from a drop-down list, saving at least a little time for the user/manager. And it gives the manager a little flexibility on what can go into a project in the way of fields.
To find out more, check out our Microsoft Project training.


