How to Create a Gradient in Adobe Illustrator
Adobe, Illustrator
The recent post on meshes in Illustrator kind of leads into a related subject, namely the gradient. Sometimes meshes aren’t necessary, or a little too complicated to set up, but there’s still a need for (at least simulated) shading, and gradients can provide some of this. They take a few steps, but they’re worth it.
(I will mention before I start that the process is a little different than in Photoshop; the nature of the use of gradients is different in each program.)

Once the file is open, we select the shape we want to put the gradient in, bring up the panel (Window menu–>Gradient), and click the basic gradient to apply it. We can select either Linear (basically bands of color) or Radial (sunburst/circles of color) at the top right of the panel, but the main part of the process is the same from there.
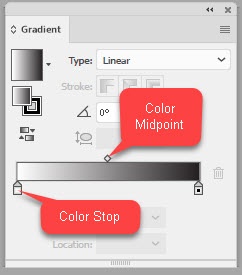
Editing the gradient involves the horizontal strip near the bottom of the panel, called the gradient ramp. The house-like shapes below it are color stops; they tell us what colors are in it. The diamonds above are color midpoints, which show where the halfway mark is between two colors. Both of these can be moved, though the midpoints can’t be removed as they automatically show between any pair of colors on the ramp.

To add colors, we click anywhere immediately below the gradient ramp to add another stop. Double-clicking on the new stop brings up the color controls, where we can use an existing swatch, or create a new color from the sliders. We can even choose other color systems from the dropdown menu at the top right of the controls. Editing existing colors works exactly the same way. (Tried finding out how many colors I could put in. It got boring around fifty….) Then, if necessary, drag the midpoints to adjust where colors shade from one to another.
Removing colors is easy—just drag the color stop straight down about a half inch, and let go.
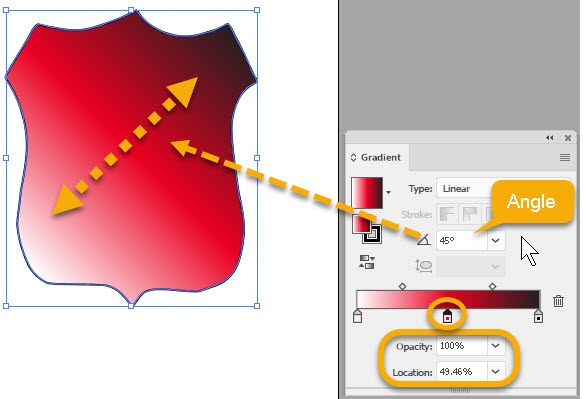
Usually, once we set up the gradient colors, we change the angle if we want. The control is almost dead center, and allows use of the dropdown or typing the angle we want. It’s even possible to adjust the opacity of a color stop, using the control at bottom. According to my students, this is somewhat less common, but certainly invites experiment. Finally, the Location control positions the color stop precisely, if needed.
To learn more about Illustrator (and the other Adobe programs), look into our Adobe Illustrator training.