How to create a tooltip using only HTML
HTML5, Web Design
Sometimes websites aren’t very specific. You see something on the page but have no idea what to do with it or what it’s for. Enter tooltips! They are helpful little windows that pop up to explain what something is on a webpage. They usually show up when the user hovers their cursor over the item. There are many ways to implement tooltips using CSS, JavaScript, jQuery, etc. But there’s one simple way to do it using only HTML. Let’s say we have an image on a webpage that we want to use as a button. It looks like this:
To insert it into the page we created this image tag:
<img src=”arrow.png”>
We haven’t set it up this way but when the user clicks the arrow, it would take them to the next page of the site. Well, just by looking at the image, the user wouldn’t know exactly what this button would do so we can add a tooltip to this image with the “title” attribute like so:
<img src=”arrow.png” title=”Next Page”>
And when the user mouses over the image on the page it will look like this:
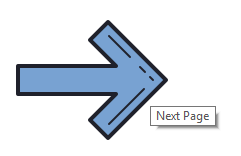
We can see that the browser added the tooltip automatically for us without having to use CSS or JavaScript. If you’d like to learn more be sure to check out our HTML/CSS/JavaScript course. Have an amazing day!