How to Create Calculated Fields in Microsoft Project
Microsoft Office, Microsoft Project
Project allows for things like calculated fields and other custom data. It holds some fields “in reserve” aside from the ones set up for task names, durations, etc. This way, users can insert data the program couldn’t know about in advance. (I mentioned custom text fields a while back, but a calculated field is a slightly different thing.)
Having some experience with formulas, in the style of Access or Excel, will help. And making sure one has a clear idea of what needs to be calculated is important, naturally.
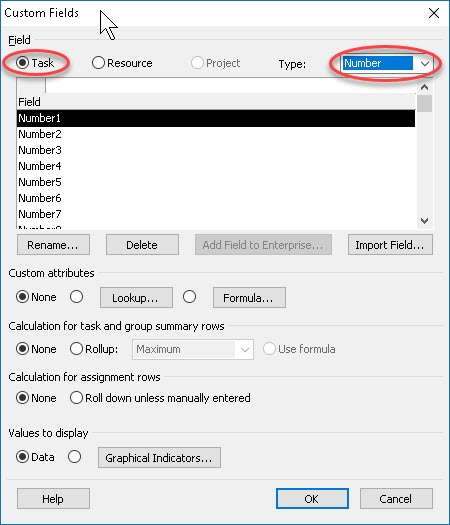
We start by calling up the Custom Fields box. It’s under the Project tab, in the Properties group. We need to know whether it’ll be a task-related field (for example, number of days till a task starts) or resource-related (checking on, say, whether someone’s overtime rate is particularly high). For this example, we’ll go with task-related.
We’ll click the Task button at top, then select Number from the list on the right. This way we can enter a formula for a calculated quantity or value.
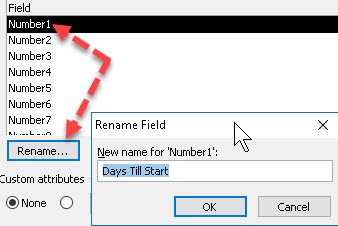
Next, we click the Rename button below the list, to give the field a descriptive name.
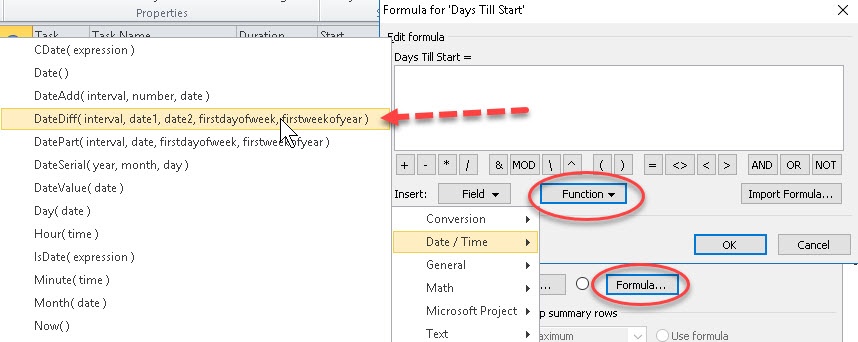
Then, almost right in the center of the box, we click the Formula button. Now we can actually write the formula. In the box, we can shortcut by going to the Function dropdown, and finding the Date/Time category. (I’ll use the example I mentioned earlier—number of days till a task is due to start.)
The thing we want to have calculated is how many days from now till the start of each task. So the function we need is called DateDiff. (You can check the Help for other functions’ info.)
The function officially needs five arguments, but only three are vital—what interval to use, the “start” date, and the “end” date. The last two, FirstDayOfWeek and FirstWeekOfYear, we can delete, as we don’t need to calculate them.

The Interval is set in units, such as days or weeks. We enter a “d” in quotes, to tell it to use days. Date1 would be today’s date, so we can again cheat and put in the Now function, just as in Excel. This lets Project ask the computer what the date is. Date2 is the start date of the task, so we drop in the [Start] field, which contains the date for each task in the Gantt chart.
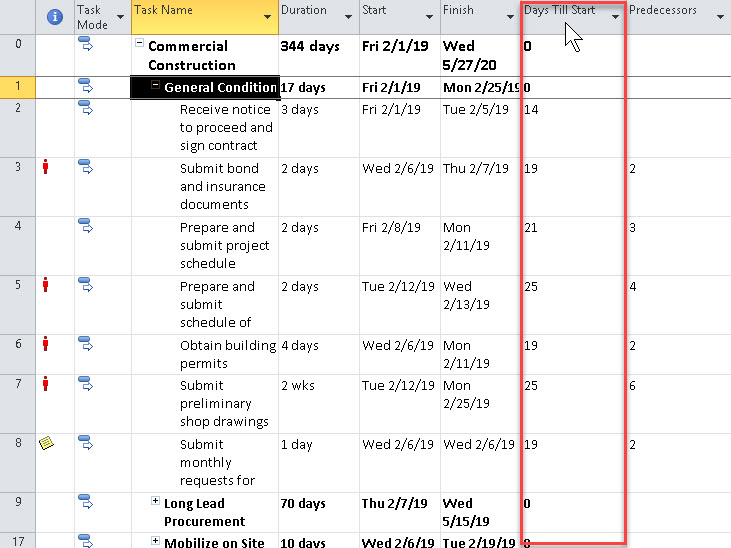
After OK-ing out, we insert the field (column) in the Gantt chart, wherever we want it among its buddies. The number we see calculated is how many days till the start of the (detail) task. If it’s negative, we’re past it—which is not necessarily a bad thing, if the task started on time. But during the run of a project, this can give the project manager another useful indicator.
To see where this comes into play, take a look at our Project classes.