How to Start with Microsoft Teams — A Few Basics
Microsoft Office, Microsoft Teams
Microsoft Teams, the messaging/meeting/hub program, allows us to centralize a few things we had to do “à la carte” before. By gathering stuff in one place, we can save time and effort.
After we install it, one of the main things is to set up the teams themselves. Groups that work together with content, tools, and projects are teams.

We go to the Teams section by clicking on the icon at left, then the gear at the bottom left. While we’re looking at the management area, we can click the “Create a team” button at top right, and decide whether from scratch or from an existing group. Early on, it’ll usually be the former.
Private or Public will be the next choice. More often, it’ll be Private because the team manager will want to keep the number of people down and focused on the reasons for the team.
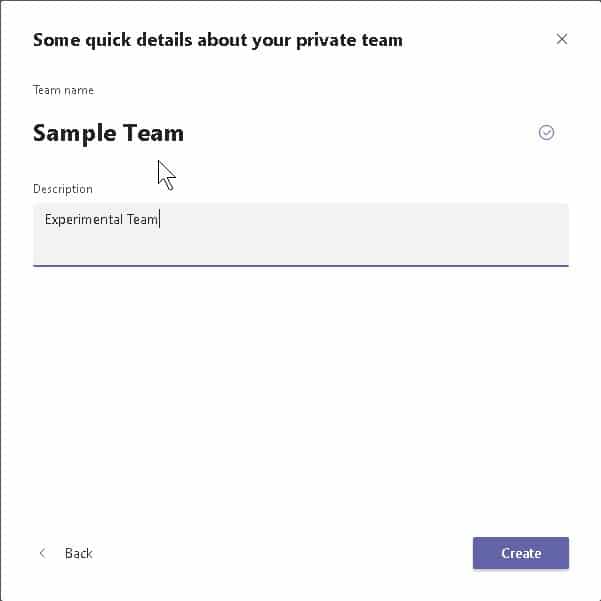
Finally, we name the team. This can actually be a little challenging because we need to keep names short but understandable. Ditto the description. As always, a little practice helps.
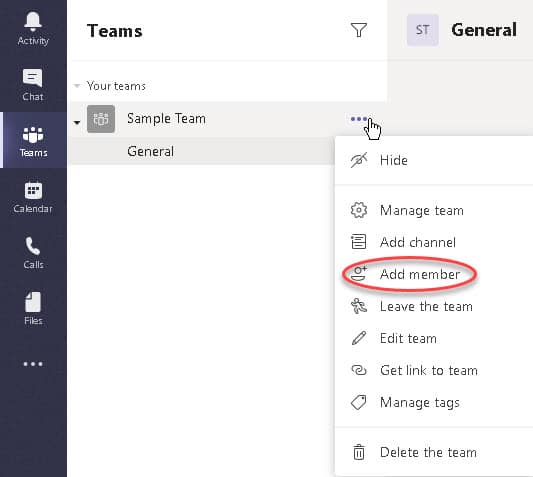
We can then add members. Click “…” (Options) next to the team name, then Add Member in the dropdown. Though you can add people outside your organization, a network admin has to enable the “guest” features involved, so please talk to your IT folks about it. Otherwise, it’s pretty much just typing in their names or email addresses. If the program can “see” them, it should auto-complete, and we then click Add for each. After we get the folks we need, we click Close at the bottom, and we’re ready.
To modify any team’s settings, assuming you’re the owner, you can click the “…” to the right of the name, then Manage Team, and do what you need. The Settings item is the fourth along the top, and lets you modify pretty much any of the permissions, channels, and so on.
An Owner can promote any Member to be an Owner, to help team management. Having a couple of owners means the person in charge can have a backup.
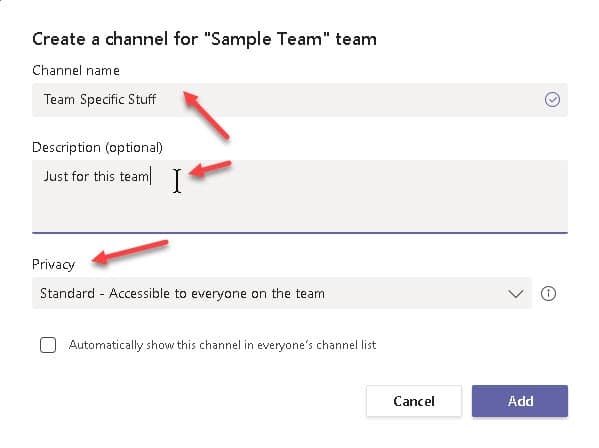
They can also include Channels. These are areas within a team for particular topics, like folders help organize files. To create one, we go to the main team area, click the “…” next to the team name, and Add Channel in the dropdown. We name it, describe it, and set the privacy for it. The choice of “standard” or “private” will depend on what’s going on within the channel. Click Add, and again, good to go.
And within a channel, at the bottom of the window, there’s a very conventional space for having messaging-type conversations. If you’ve ever used any other electronic message programs, the basics are the same.
![]()
Regular chats work the same way, and can easily become a video or audio chat. Clicking whichever icon at the top right of the chat window sets it up.
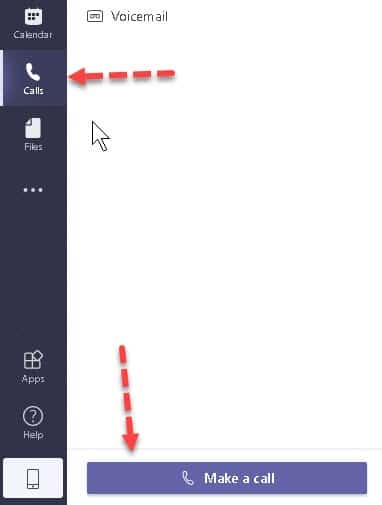
As for video and audio meetings, or calls, as Teams refers to them, it couldn’t be simpler. The main requirement aside from hardware is having someone available via email. We click the calls icon at left, Make a Call at the bottom left, then specify who we want to talk to by clicking the appropriate icon to the right of the name.
And for an entire team to meet, the organizer selects it, and at the bottom of the window clicks the camera icon. Then, in the video window, click on Meet Now, and it’s underway. Anyone who needs to join clicks the Join Now button in their team channel.
There’s more to see in Teams; check out our offerings in our Office 365 training.