Software Requirements
- Microsoft® Windows® XP Professional®, Vista® or later.
- A default installation of Crystal Reports® 2013 (download a free trial version by clicking here.)
- A default installation of Microsoft® Office® 2007 or higher.
- An installed print driver. (Printers are not required; however, each PC must have an installed printer driver to use Print Preview.)
- A default installation of the free Adobe® Acrobat Reader® 8.0 or greater.
- In addition, this course requires the use of SQL Server 2008 or SQL Server 2008 Express Edition – please follow the instructions below if you do not already have SQL Server 2008 or 2008 Express installed. If you do already have SQL Server Express installed, please follow the instructions below to attach the AdventureWorks database starting at step 16.
Download Course Files and Setup
Please follow the instructions below to complete the setup of the course.
- Download SQL Server Express 2008 R2 SP1 – Express Edition from http://www.microsoft.com/en-us/download/details.aspx?id=26729
- Click the Download button.
- If prompted, select “No, I do not want to register. Take me to the download” and click the Next button.
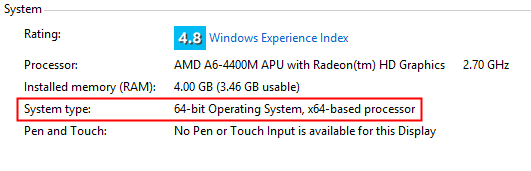
- Select SQLEXPRWT_x64_ENU.exe if you are running a 64 bit operating system, or SQLEXPRWT_x86_ENU.exe if you are running a 32 bit operating system. If you are not sure which operating system you are running go to Windows Explorer, right-click on “My Computer” and choose “Properties.” Your system type will be displayed.
- After selecting the appropriate file, click the Next button.
- Save the downloaded file to a location you will remember.
- Once downloaded, launch the installation file exe.
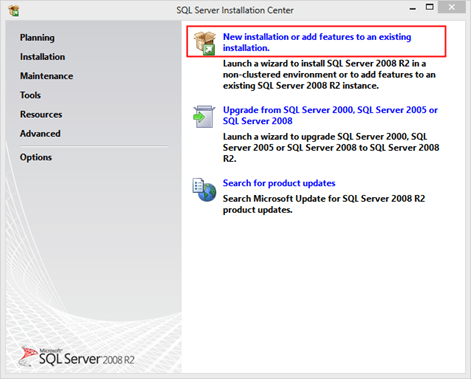
- From the SQL Server Installation Center, select “New Installation or add features to an existing installation.
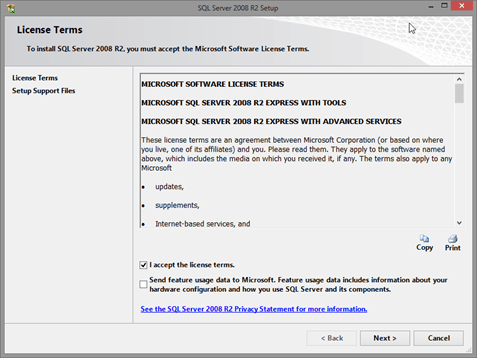
- Accept the license terms and click the Next button.
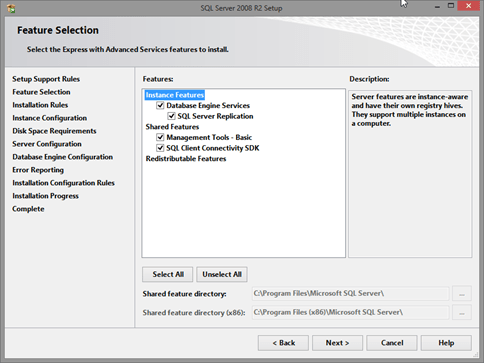
- All features should be selected by default, but if not, click the Select All button and click the Next button.
- Accept the Named Instance in the Instance Configuration dialog and click the Next button.
0
- Click the Next button on the Server Configuration dialog.

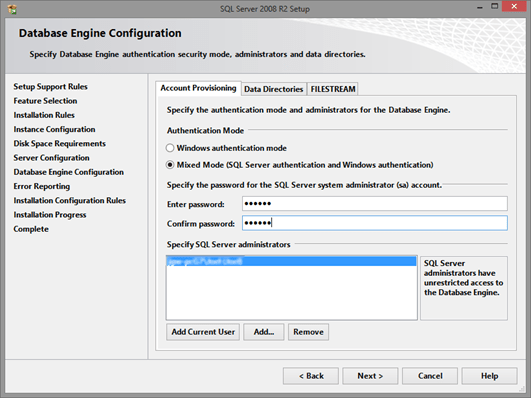
- Select “Mixed Mode” under Authentication Mode and enter a password of cr2008 for the sa account. If you receive a message that this password is not complex enough, choose another more complex password, but be sure to write the password down for later use. Re-enter the password in the Confirm Password field and click the Next button.
- Click the Next button on the Error Reporting dialog.
- Click the Close button once the installation is complete.
- Install the course files, including the database you will be using in class by clicking here.
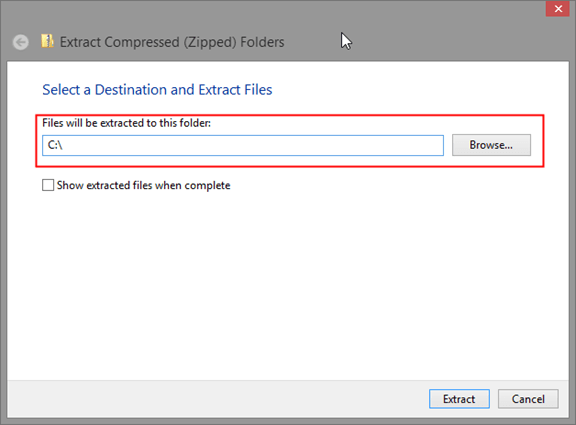
- Once the zip file has downloaded, extract the files to the root of your C: drive.
- Open Windows Explorer and navigate to the location: C:CR2013D3ClassFilesDatabases
- Right-click on the AdventureWorks_Data.mdf file and select Properties.
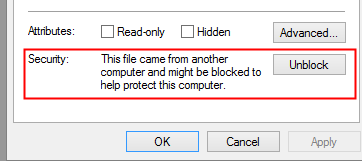
- Depending on your Windows configuration, the file may be blocked because you downloaded it from the internet. If this is the case, you will see a security message at the bottom of the General Tab in the Properties dialog box alerting you to this. Click the Unblock button and then click the Apply button.
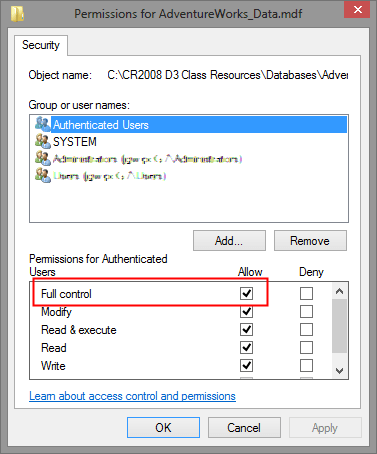
- Click the Security Tab in the Properties dialog.
- Select the Authenticated Users group from the Group or User Names list.
- Click the Edit button.
- In the Permissions dialog box, check the Allow box next to Full Control. Click the OK button to close the dialog.
- Click the OK button to close the Properties dialog.
- Repeat steps 19-25 with the Adventure_Works_Log.ldf file in the same directory.
- From the Windows Start Menu, under All Programs, open Microsoft SQL Server Management Studio (which may be located under the parent folder Microsoft SQL Server 2008 R2)
- In the Connect to Server dialog, click the Connect button.
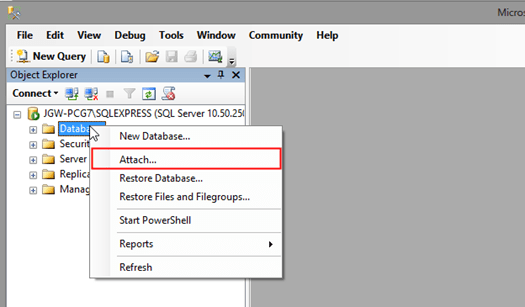
- In the Object Explorer Pane, right-click on the Databases folder and select Attach.
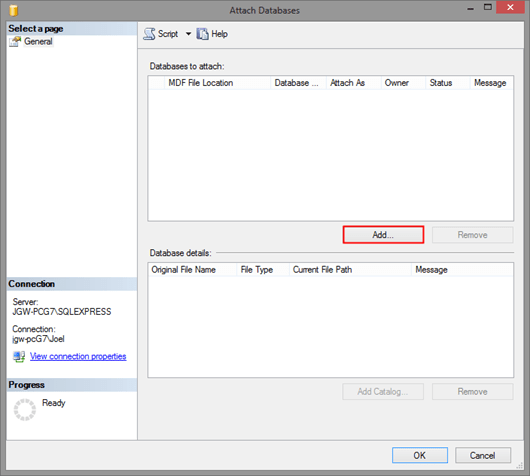
- In the Attach Databases dialog, click the Add button.
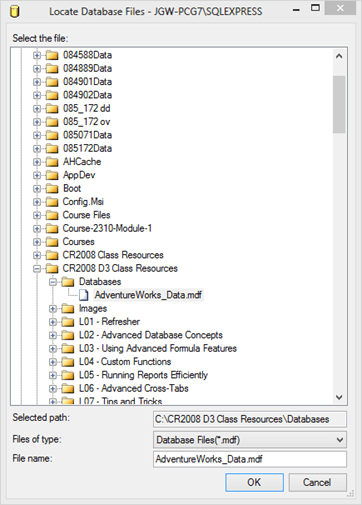
- In the Locate Database Files dialog, navigate to the C:CR2013D3ClassFilesDatabases directory and select the AdventureWorks_Data.mdf files. Then click the OK button.
- Click OK again if you receive a notification about Catalogs.
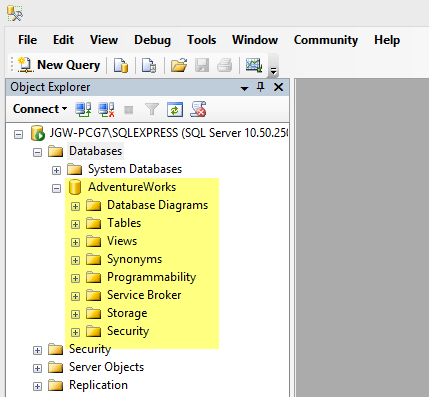
- Once the Attach succeeds, you should see the AdventureWorks database listed under the Databases folder in Microsoft SQL Server Management Studio.
- You can now close Microsoft SQL Server Management Studio.