Using Layer Masks in Photoshop – Basics
Adobe, Photoshop
When we put together a composite image in Photoshop, built from pieces of other images, using layer masks is a very helpful trick. Masking allows us to experiment with the appearance of the composite by letting us show or hide very specific bits of the layers in the image, and adjust what shows without editing or deleting any of the actual images in the layers.

First, we assemble the pieces of the composite. The number of layers is entirely up to the user, of course. (Recently found out the actual max number you can have is 8000. Wow.) Then, of course, arrange the layers in whatever order you need.
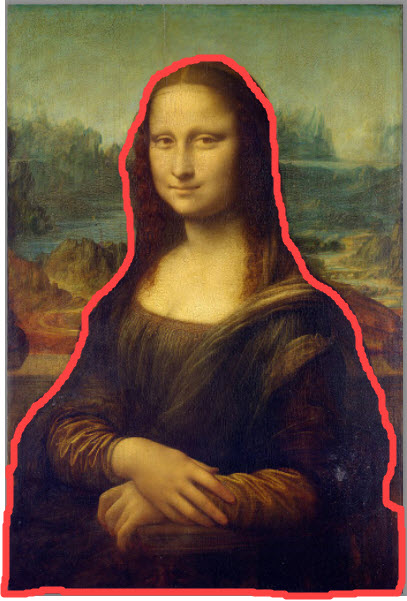
Now, the real key step in masking in a layer is selection (which is why I’ve emphasized it in other posts, and will continue to do so). So using whatever tools and variations we like, we select the area(s) we want to un-mask after selecting the layer in question. That is, we select what the masks should not hide.
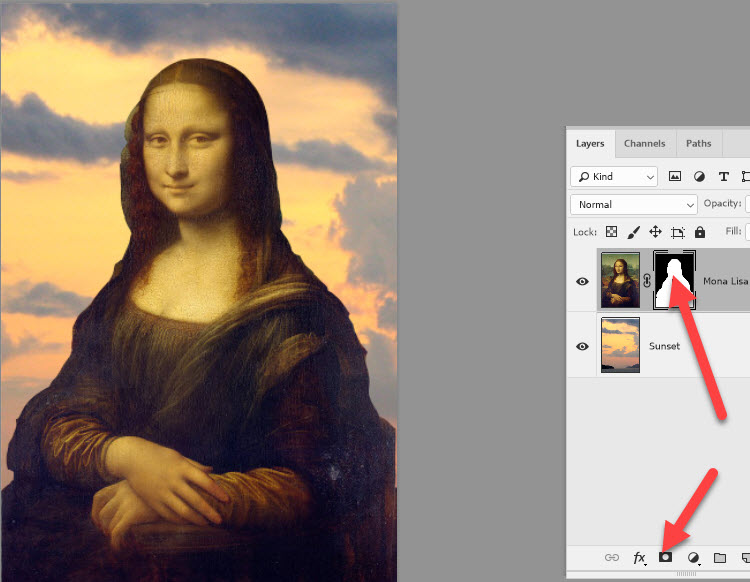
Next is to give the command to create the layer mask, simply by clicking the appropriate button at the bottom of the Layers panel. This is the easy part, but still important. When we do this, we can often see a few bits we missed in the selection part. And the good news is that we don’t have to start all over again—we can edit the masks themselves to include the bits. We do this by using the painting tools—which are often easier to work with than the selection tools.

Set a brush to moderate size (depending on the image size), perhaps ten or twenty pixels here, with a hardness of 100%. This gives a nice sharp edge with which we can clean up bits of mask/selection. The Layer Mask thumbnail is selected in the layer in question; set the Foreground color to black (which hides) or white (which unmasks, or reveals), and do the touch-up.
(FYI, just so it’s all step-by-step on this part:
1-Select the layer MASK in the layer. 2-Select and adjust the brush you want to use to fine-tune the mask. 3-Check the foreground color in the Tools panel is black for adding to mask, or white for un-masking. 4-Paint the appropriate areas.)
Is it a little tedious? Yes, but not really difficult. Mainly zooming in to do a few bits and then zooming out to check. Photoshop may not do all the hand-work when we mask. But at least we don’t have to clean up all the paint smears.
To learn more about Photoshop (and the other Adobe Suite programs), try our Adobe Photoshop courses.